|
For the new wine maker we recommend you start with wine juice and later progress to grapes. More advanced techniques using fresh grapes can be found in our section "Fresh Grape Wine Making". This receipt uses wine juice and/or concentrate. |
|||||||
|
The ValleyVintnerTM |
|||||||
|
Kit's are configured with all necessary equipment for the home vintner. These allow the Boutique Vintner to craft quality wines with precision similar to that of large wineries. Although the equipment is optimized for the small Vintner, the process is the same as those used in large operations. Key Note: Keep a journal on your measurements and dates. Be sure to include Date, Wine type, Temperature, Specific Gravity, PH, Acidity and any notes on color, smell or other comments for future recall. These will be used to track your wines progress and for future reference. |
|
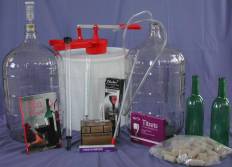
Equipment: 2- 5 Gallon Glass Carboys 1 Gallon Glass Jug Plastic Primary Fermenter (7 gallon capacity) Wine Yeast Sorbate (used as a stabilizer) Thermometer Campden Tablets or Potassium Metabisufite (not Sodium) Raking Tube and Siphon Hose Wine Hydrometer Acid Kit PH Strips (or meter) Airlock
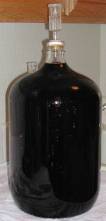
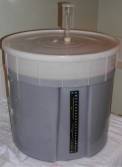
1) Always, again, always sanitize equipment using either a one step sanitizer or sulphite solution (2 oz metabisulfite per gallon of water, let sit 10 - 20 minutes before rinsing). Then pour your wine juice into the plastic food grade primary fermenter. You fermenter should be large enough to leave some head room for foaming during fermentation.
2) Next we'll take a sample to record the sugar, acid and PH content before inoculating (pitching) the juice with yeast. California grapes and juice from kits seldom need adjustment. This process gives you a baseline for measuring your wines progress and provides necessary experience for later adjustments in crafting advanced Boutique Wines. The hydrometer reading for sugar should read between 1.070 - 1.095. If juice is below 1.070 you may want to add table sugar. Approximately one pound of sugar will raise the specific gravity .010. If you decide to increase the specific gravity, add sugar slowly, stir often, and take frequent readings.
3.) Now record PH and acidity from your "must" sample. Use a PH meter or strips and an acid test kit. PH readings are straight forward (although if using a meter be certain to calibrate before testing). Typical PH readings for white wine run from 3.2-3.5 and 3.2-3.6 for Reds. The acid test may take a bit of practice but it is not difficult. Follow the instructions on your test kit and practice until you are comfortable with the procedure. Total acidity for White wines should range between .6-.8%. For Red the desirable levels are .5-.65%. ValleyVinter uses only California grapes and juice that rarely needs acid adjustment. If adjustment is necessary please contact our staff for direction.
4.) With measurements complete it's time to inoculate the juice. First prepare the yeast by sprinkling the packet(s) into 1 cup of warm juice (under 100oF) and allow to sit for 10-15 minutes, stir gently. Next add the yeast to your primary fermenter and mix thoroughly. Cover the fermenter with a lid and airlock. You should see fermentation begin within 1-2 days. Watch the temperature of your fermentation and keep it below 80oF but above 60oF. You may need to float frozen water bottles in your fermenter if the temperature gets too high (note that a longer cooler fermentation is preferred in the range of 60oF to 70oF).
5.) Once fermentation starts, measure and record the temperature and specific gravity daily. Keep the airlock filled with water and the fermenter in a cool dark place for 10-12 days. Monitor this daily assuring the airlock is tight and clean of foam from fermentation. Soon you should see a significant amount of sediment at the bottom of the fermenter.
6.) After 10-12 days fermentation should have slowed (as evidenced by fewer bubbles escaping thru the airlock). When the specific gravity reaches between 1.000 and 1.020 it's time to transfer the wine off the sediment from the fermenter to a 5 gallon sanitized glass carboy . At this time you may add a clarifier or fining agent. The fining agent helps to clarify the wine and remove residual sediment. We prefer multiple rackings but if you are using a kit that supplied a fining agent (like chitosan or isinglass) you may chose to add it now. Follow the instructions supplied in your kit for this addition.
7.) Next add 1/4 teaspoon Potassium Metabisulfite or "Crushed" Campden tablets (1 per gallon) to the 5 gallon sanitized glass carboy. Siphon (rack) the wine from the fermenter into the carboy leaving about 2" of head space in the glass carboy. Keep additional wine in a separate 1 gallon jug (also with an airlock and stopper) for use in subsequent rackings. Be careful not to jostle the fermenter to avoid disturbing the sediment during transfer. You should leave a few inches of wine filled with sediment behind with each racking. Oxygen and light are now the enemy. Place the carboy in a cool dark place for 1 month. Check the wine regularly and keep the airlock filled to the proper level with water.
8.) After 1 month again gently siphon (rack) the wine from the 1st carboy to a second sanitized 5 gallon glass carboy leaving the new sediment behind. Use the extra wine from the 1 gal jug to make sure there is little to no air gap in the new carboy from this time forward and replace the airlock. Place the carboy in a cool dark place and allow it to bulk age for 3 months or more (longer the better). Check the wine regularly and replace water evaporated in the airlock. Tip: For white wines at this point we recommend "Cold Stabilization". Place the carboy in a refrigerator set at 25o to 35oF for 3-4 weeks. This will help to precipitate undesirable Tartrate crystals out of your wine as sediment that would later show up in your bottles.
9.) Ready to bottle! If your wine is clear, stable (finished fermentation) and cold stabilized you are ready to bottle. You can chose to filter your wine or go straight to the bottle. We prefer to filter only white wines, however either or neither works well. If filtering, make certain you have the appropriate grade filters or you could strip color and flavor from your wine. Before bottling add 1/4" tsp metabisulfite or "Crushed" Campden tables (1 per gallon) to your wine and mix thoroughly. Tip: To sweeten or flavor your wine, add 1/2" tsp per gallon of sorbate to another carboy, add sugar syrup, and/or flavoring. Rack your wine into the carboy and stir to mix ingredients. Sorbate acts as a stabilizer to prevent renewed fermentation after bottling.
Let it age! Wine initially experiences "Bottle Shock" and needs time to develop it's bouquet. Although immediately drinkable both red and white wines get much better with time. The difference between 1-2 months and 1-2 years in the bottle, is the difference between friends singing praises on your behalf or quietly commenting on your interesting hobby. |
|||||
|
|
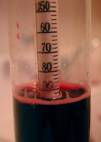
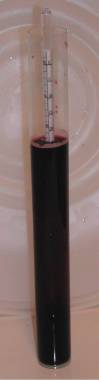
SG = 1.094 @ 60o F |
Measure sugar content by gently inserting the hydrometer into your "must" (juice) sample. Give the Hydrometer a quick spin to flip off bubbles that might impact your reading. Note that the liquid will slightly "wick up" the sides of your test tube. Take your reading from the lowest point of contact made by the liquid on the Hydrometer stem. Record and adjust your reading based on the temperature of your sample and for which your Hydrometer is calibrated. Roughly for a Hydrometer with a 60o calibration, add .001 to your reading for each 10o F above and below 60o. If the sample is 70oF a reading of 1.085 is actually 1.086. |
|||||
|
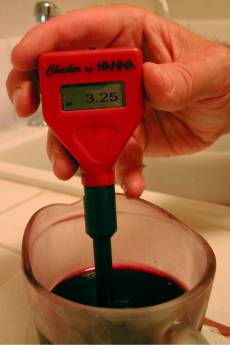
Use a PH meter or strips (PH paper) and an Acid Test kit to record PH and Acidity. If using a PH meter, be certain to calibrate it prior to taking your reading.. Measuring acidity may take some practice but it isn't difficult. Follow the directions on your test kit. Be careful, the reagents used in the Acid Test Kit are caustic. |
|
||||||
|
|
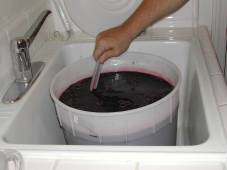
Prepare your yeast then pitch the yeast into the must and cover. Keep temperature under 80o F. Fermentation should begin within 48 hours and continue for 10-12 days. Measure and record specific gravity and temperature daily. |
||||||
 |
|||||||
|
|
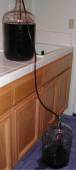
When the specific gravity drops below 1.020 (10-12 days), siphon (rack) the wine from the fermenter into the carboy leaving about 2" of head space in the glass carboy. Place the carboy in a cool dark place for 1 month. |
|
|||||
|
|
After 1 month again siphon (rack) the wine off its sediment into another sanitized carboy. Replace the airlock and place the carboy in a cool place for 3 months. Check the wine regularly and replace water evaporated in the airlock. |
||||||
|
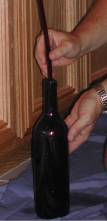
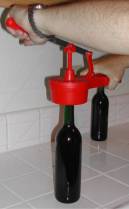
Siphon the wine into sanitized bottles leaving approximately 2" of cork clearance. A bottle filler (tube with gravity or spring plunger) can assist in maintaining consistent wine levels. |
|
||||||
 |
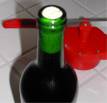 |
Insert the cork into the corker and position it on the bottle. If using a hand corker as the one shown have someone hold the bottle while you cork. Finally to help the cork form it's initial seal leave the bottle in a standing position for a few days. Age your bottles on their side in a cool dark place. | |||||